
-
Hi Rita, I have not tried the Machingers so can't comment. I got the Graberoos through Amazon medium size are £5.24 small and large sizes a slight difference in price.
Also on the page were some Fons and Porter gloves which a friend bought because they were cheaper but they aren't as nice and she is now getting the Graberoos.
The Graberoos fit really nicely and the dots are almost sticky, I love them.
Anne -
Geneva, the Kaffe Fasset stars are wonderful. Love it!
Comment
-
Love the stars and the fabric--quilting is perfect fit.
Comment
-
WOW ! and double Wow !
Comment
-
I've just posted it in the group photos. There are some great mug rugs I don't think I'd seen them all.
Mug rugger and lounge lizardComment
-
Beautiful job, Geneva! Wendy is very lucky!
Comment
-
Pretty mug Geneva, lucky Wendy.Comment
-
And lucky me! Look what arrived in my mailbox yesterday from Wendy!
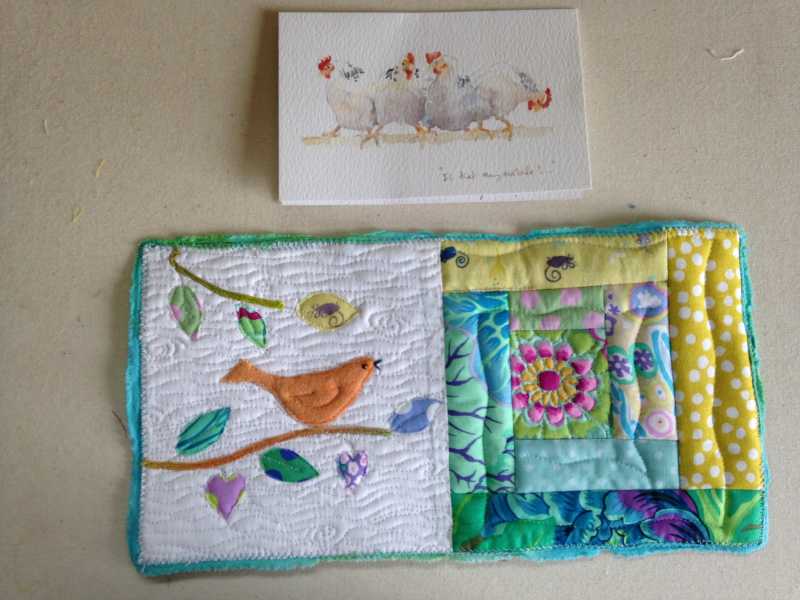
And the back:
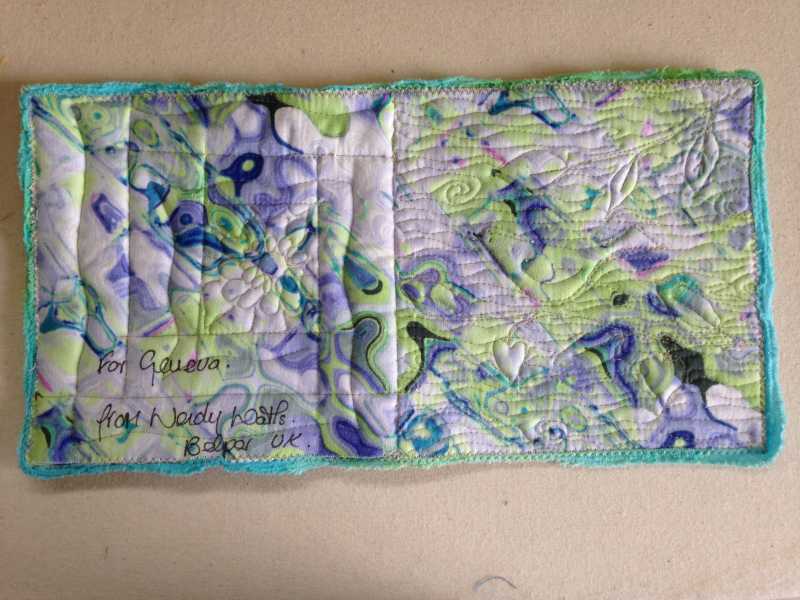
The quilting is so perfect, the edging really nice. I love the little bird and the fabrics. In fact, I think the little yellow dot is the same Kaffe fabric I used on your mug rug Wendy! And the log cabin block has a crinkling sound when I touch it. What did you put in there Wendy?
I'd really like to know how you did the edging. I'm just about done trying to do zig zag edge finishing. It seems I can never get it smooth and it sticks as I'm zigging. Wendy, your finish is really nice. Thank you so much!!!
genevaGenevaComment
-
It's beautiful, Wendy! You are both so talented!!Comment
-
Yes I agree it's beautiful and yes Wendy and Geneva are both very talented!
Barb :-)Comment
-
Wendy and Geneva, your mug rugs are wonderful. I did explain the concept of a mug rug to my DH the other morning, and all he said was, "It must be a quilter thing." So much for enlightening him! :side: Right now I just use a pot holder, but promise one day to jump in and do some trading. Oh........... I received a pot holder from a friend (she gave a few friends her practice sew outs of her digitized embroidery designs) and found it very useful on the very large harp area of my new sewing machine. When I'm doing small piecing I like my stiletto, scissors and few pins close by, and the harp is big enough to hold it all. The pot holder saves the surface of the sewing machine. (Doesn't work for larger sewing, as it is in the way then.)
DawnComment
-
Wendy, I vote that you somehow post your know-how via something or a tutorial, so we can all learn how you make such nice edges. I love the one you sent to me. PLEASE?? :kiss: :silly:Comment
-
 pleased you like it. The inside is some thermal batting, one side is silver.
Edging tutorial - easy peasy. Taught to me by Carol Ann Waugh Craftsy class stupendous stitches.
1. Trim all layers to size.
2. Zig zag round edges starting half way down one side. Use thread to match front of piece and set stitch width to about 1.5 and length 1.75. Lower your top tension to 3.25. Keep the edge at the centre of the needle position. Whiz round all sides.
3. Trim any wayward threads
4. Choose edging yarn, rat tail cord or what you like. I used bias fairly loose woven cotton, it's almost scrim.
5. Choose thread to match trim and set stitch width to 3 , length 1.5.
5. Start half way down an edge and place edging next to edge of work but not on it, leave a 1" tail.
6. Position so join is in centre of needle positions so when you sew it'll pull both together.
Start zig zagging but don't put any tension on your trim. Don't worry if bits don't catch you can go over it again.
7. At corners drop needle into fabric or trim and pivot like a ballerina.
8. As you get to last side cut off starting trim at a diagonal and keep going till just past the start.
9. Trim your finish at an angle and done.
Mug rugger and lounge lizardComment
-
Thanks Wendy. For 'easy-peasy' it has a lot of steps!
Hope you don't mind, but I've copied them onto a Word doc for myself, so I don't have to scroll through 100's of pages of posts, and try to remember which topic etc. :cheer:
Mug rugger and lounge lizardComment
-

-
-
-
-
-
-
-
-
-
-
-
-
-
-
-
-


What's Going On
There are currently 4569 users online. 216 members and 4353 guests.
Most users ever online was 45,077 at 12:30 PM on 02-01-2026.
Working...
Comment