
-
Great videos! What are the thingys that are attached to your rulers? Looked like it was sturdy and made it easy to position them.
-
Great videos. This paper piecing technique is much more inviting than others I've seen. Very, very clear instructions. You have great teaching skills. Thanks.
Comment
-
TREES AND TRIANGLES
I followed Margo’s suggestion to paper piece this panel (THANK YOU, THANK YOU, THANK YOU!).
PANEL SIZE: 6” x 8” (finished) BLOCK SIZE – well it doesn’t matter, I’m not doing it in blocks... but if you are following the instructions, a block refers to a single tree, so it’s 2” x 2”.
I drew the panel in EQ7 and was able to get the foundations:

It changes the cutting instructions a little.
For the top of the trees, you will need to cut a strip of 1-3/4” in green, and the same in sky blue, This is a little oversize but it will make sure you have enough room for placement. Cut each piece from the strips – you can use a template made from the foundation (about 3/8” bigger).
For the middle of the trees, you will need to cut your strips 1-1/4” in green and the same in sky blue.Cut each piece in a similar manner as the tree top.
For the section with the tree trunk, the strips need to be cut 1-1/4” (sky blue and brown), again to have more room. It will be cut to 1 inch once it is completed.
The background needs to be cut 4-1/2” x 4-1/2”.
For the HST on each side, you need 4 squares 2” x 2” of the chosen colors, as well as 4 squares 2” x 2” sky blue (again, this is a little oversize, but you want to have room for placement). Cut them once on the diagonal.
Paper-piece each unit. For those interested, please send me an email so I can provide the PDF.
At this size, I prefer not to leave the 1/4” seam allowance on the paper, but I make sure I have fabric beyond that 1/4”- I will cut to correct size once the unit is completed.
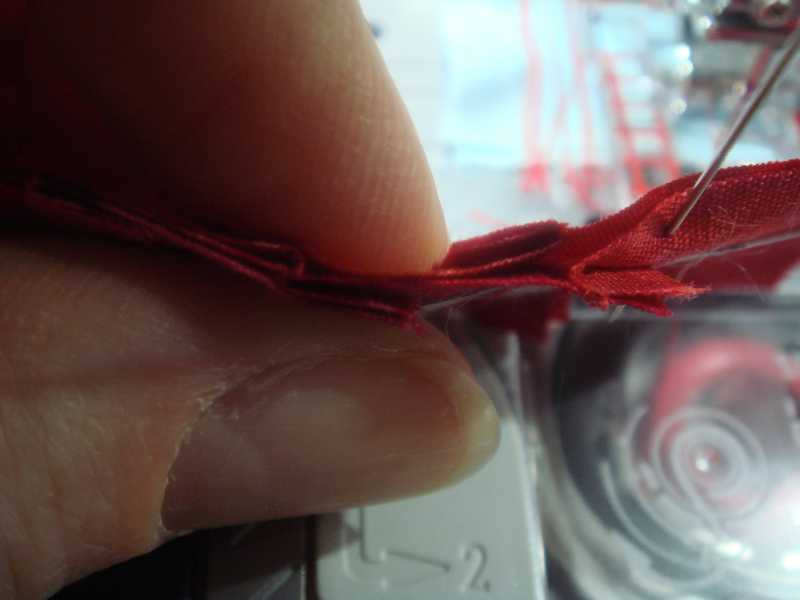
When placing the next piece at an angle, I fold the foundation and make sure that the fabric “covers” the foundation PLUS the 1/4” seam allowance. On this picture, my next piece is the last tree in the middle tree section. you see that the fabric covers the foundation plus the seam allowance, so I can sew this...

It fits!

Comment
-
After all is pieced, you need to join the HST units to each side of the background. I sew just next to the foundation (and not on the line).

Then, join each section of the trees on top and on the bottom of the panel, and join them to the center.
I drew a “T” similar to the one on the “The Quilt Show” logo.

I will blanket stitch in a darker green... or blue.... not sure yet....Comment
-
Love your tutorials, Andrée

living in Central Denmark
Charlie Brown: The secret is to look fantastic at a distanceComment
-
Thank you Norma!
AndréeComment
-
Awesome job Andree! And I love your "T"!
It's Not What You Gather, But What You Scatter
That Tells What Kind Of Life You Have Lived !Comment
-
Wow, a different take on things. Very clever!
deniseComment
-
Andrée, your "T" is a beauty and I enjoy reading your tutorials--thank you for posting them!


Comment
-
VALENTINE
PANEL size : 7” x 3” Block size: 3” x 3”
After making the “T” block using paper-piecing, I guess I caught the “bug” and see potential everywhere
I drew the heart in EQ7 and printed the foundations.

I numbered each column, alternating from top down and from bottom up on each one. This will ensure that the seams will “nest” against each other.
Also, since I’m sewing each column individually, I can chose fabric (and not make 4 sets that follow the same order).
Each individual square in the heart should be 1/2” x 1/2” finished. Add to that 1/4” seam allowance, each square should be cut at 1” x 1”, but I prefer to give myself some room, so I cut them 1-1/4” x 1-1/4”. I placed them as I wanted them to appear (but I forgot to invert, so in the end the “pink” part will be on the right hand side instead of the left like I imagined).

I also cut the 4 background squares required for the top of the heart at 1-1/4” x 1-1/4”.
I prefer not to have the seam allowance on the foundation. Knowing the fabric is a little bigger than required, when I start the piecing of the HST, I will center the resulting square and sew on the diagonal. Then I will remove the excess fabric. OK, on this one, the foundation is “used” – I had taken the “wrong” fabric initially, so I had to undo.

Comment
-
Once the unit is all pieced, I trim the excess fabric on each side, and on the top – but I leave the bottom as is. (sorry for the “bad” photo, it looked OK on the camera...)
The result:

Then, I sew each column in pairs. Make sure that the seams “kiss” each other.
I sew each pairs and this is the result – it doesn’t quite look like a heart... until the sashing is sewn on the top, I see something else!
I leave the foundations on. I do not remove them yet...

Comment
-
I align the 1/4” mark on my ruler, against the corner of the 4th square on the second column and the corner of the 5th square on the third column, and I draw a line. I do the same on the other side:

This is to align the raw edge of the background fabric – Cut 1 square 2-3/4 x 2-3/4” and cut it once on the diagonal. Then place one triangle on the line, making sure that the seam line will go beyond the block on each side, and pin in place:

Sew on the line of the foundation:

Comment
-
Press, and cut the excess fabric in the seam allowance. Do the same on the other side:

Press and cut the excess fabric in the seam allowance that shows thru. Trim the excess fabric of the background color to get a “nice” square – it should be 3-1/2” x 3-1/2”.
Sew the background to the right of the block, and fuse the “V” in place. To align it, I made sure that the “curve” of the “V” would meet the tip of each HST at the right of the heart, and that the top of the right “V” “arm” would be horizontal.

I will have a lot of blanket stitching to do! All those letters...Comment
-

-
-
-
-
-
-
-
-
-
-
-
-
-
-
-
-
-
-
-


What's Going On
There are currently 13796 users online. 173 members and 13623 guests.
Most users ever online was 45,077 at 12:30 PM on 02-01-2026.
Working...
Comment