
-
Hi all! I'm the friend in question -- to answer a few questions, the 2 size rays are meant to be different sizes per the pattern instructions/drawing. So, those are accurate.
The template didn't originally have seam allowances in it, so reducing by 50% ought not mess that up, since I'd be adding the seam allowances when i cut anyway.
The outside edge bit I *did* draw/cut smaller than 1/2 size at first, which I think is the main problem. Hooray for Joyce helping me fix it! The outside edge bit should be symmetrical (the beige pieces) so no idea on reversing those....the rays, no, but the edge bit, yes.
Problems most likely stem from error on my part, as I'm quite the newbie, taught only via email from afar and as my name suggests, Learning as I go! Will happily await Joyce's EQ drawing before I attempt this on my own again. Luckily I massively over-bought all the various fabrics for the quilt I'm doing (diary quilt, so each block is different) so have plenty of each to keep trying this until I get it right!
many thanks to all of you who are helping Joyce help me!! So appreciative! (and, hey, if anyone knows an easier sun type block than this one, maybe that's a thought as well.....????)
Signed, Heather, not afraid to bite off more than she can chew
-
Oh my goodness -- your kindness in helping has given us a new international member!
Thanks to the super instructions ... I got the block drawn!! Every time I use EQ, I learn a bit more. Thank you!! I'm hoping it traveled safely across the miles electronically and can help.
We'll keep you posted! She really is an amazing quilter... learning just via email. I'm glad now she can access all the TQS info & your brains to keep learning. :mrgreen:Jules~
@julesquilts on IG
working farm wife and quilter in the off-seasons
Tired.
Modern quilter, QOV volunteer, Improv, FPP w/o stitching on paper, freehand quilting on my long-arm.
BERNINA 790 Pro, Elna Serger, Handi Quilter Fusion, 3 FW, a lot of old Singers and other vintage and antique machines (25+).Comment
-
Hello and welcome 'friend in question',
it sounds as if you have found the probable culprit to this attempt. For this pattern you will need to be able to cut reverse or 'pairs' of shapes and an easy way to do this would be to put your 2 fabrics right sides together and then cut the 2 layers as one, that way you will create a 'pair'.The outside edge bit I *did* draw/cut smaller than 1/2 size at first, which I think is the main problem. Hooray for Joyce helping me fix it! The outside edge bit should be symmetrical (the beige pieces) so no idea on reversing those....the rays, no, but the edge bit, yes.
To help you get your head around the idea of pairs, consider your hands, you have a right hand and a left hand, together they make a pair of hands not two hands. Two hands could refer to 2 right hands, 2 left hands or one of each. I learnt this the hard way in dressmaking that you always require a pair of sleeves not two sleeves for a jacket or blouse
Good luck, have fun, you know where to find us now, and remember the only dumb question is the one that isn't asked!
RosemaryJules~
@julesquilts on IG
working farm wife and quilter in the off-seasons
Tired.
Modern quilter, QOV volunteer, Improv, FPP w/o stitching on paper, freehand quilting on my long-arm.
BERNINA 790 Pro, Elna Serger, Handi Quilter Fusion, 3 FW, a lot of old Singers and other vintage and antique machines (25+).Comment
-
That is exactly what I saw! But I think it is just the way the person drew it. The pattern pieces appear to be the same size, though.Originally posted by SuperJudy
Oh, and Learning, I just saw that you just joined today! Welcome!!!!!
Dawn
In beautiful Northwest MontanaComment
-
Rosemary/Posy -- thank you! That does make sense. Will definitely cut the next bits together like that, hadn't thought of cutting them at the same time as 2 layers. Way less tedious than cutting all the turquoise, then flipping the template and cutting all the yellow.Originally posted by PosyP
Joyce/She Sews did send me the corrected drawing (thanks again, all of you!!, for the help!) and I'm ready to trace and cut and sew another fan section to see what happens this time. Wish me luck!Comment
-
Thank you, Dawn! I'm pretty new at quilting, and yes, just joined today when my dear friend & quilting mentor Joyce mentioned she'd posted questions here on my behalf.Originally posted by ScoopieComment
-
Glad to have you join us Heather!
It's Not What You Gather, But What You Scatter
That Tells What Kind Of Life You Have Lived !Comment
-
[/quote]
Oh my goodness, you are amazing!!! Thank you!!! HOORAY!![/quote]
It's the EQ program that is amazing! Thanks to whoever developed it and to all the instruction writers. If you get some of the extra instruction books such as Pieced Drawing you can do some amazing things with it.
Also on the drawing I did the sections are identical in size. It's just an optical illusion that they look different, possibly because that center square cuts off a corner. Cutting the units in pairs is a great idea. And reducing with seam allowances is always a problem. Usually the seam allowance is marked on the template so you can see that it has been reduced. I didn't see any seam allowance markings on the original drawing so assumed they weren't included.
Welcome to thequiltshow, Heather! Be sure to post your finished block.
Comment
-
Oh my goodness, you are amazing!!! Thank you!!! HOORAY!![/quote]
It's the EQ program that is amazing! Thanks to whoever developed it and to all the instruction writers. If you get some of the extra instruction books such as Pieced Drawing you can do some amazing things with it.
Also on the drawing I did the sections are identical in size. It's just an optical illusion that they look different, possibly because that center square cuts off a corner. Cutting the units in pairs is a great idea. And reducing with seam allowances is always a problem. Usually the seam allowance is marked on the template so you can see that it has been reduced. I didn't see any seam allowance markings on the original drawing so assumed they weren't included.
Welcome to thequiltshow, Heather! Be sure to post your finished block.[/quote]
THANK YOU for clearing this up!!!! So, that is likely part of the original problem I had as well. What craziness!!!
Okay, will definitely come and post a picture whenever I get this cut and sewn. Plans to do so while my youngest napped were a bit of a fail, as I fell asleep before he woke! oops!!! So, tending the house, then will cut (finally! have been saying that all day...) and sew and maybe tonight or tomorrow have this block finished. We'll see.....I'm slow-going doing it by hand and between life and all.Comment
-
Annis: You are amazing! Your problem solving and directions are first rate!!!Comment
-
Okay, folks, another question! My friend Joyce isn't home to answer me and I'm impatient, LOL!
I re-cut the pieces per the instructions that Joyce sent me (thanks to Annis' help on the EQ7). Got the fans all sewed together, the border wedges sewn on. Everything is straight! Hooray!!
Now I'm stuck --- how do I attach them to each other and then the center block????
I mean, in what order???
Do I attach two fan pieces (make 2 sides of the frame) to one another? Then attach the center block (the inside of the frame) to both of those frame pieces?? Then attach a 3rd fan, first to the fan, then the center block?? Then the 4th, in the same manner/??
Do I attach all 4 to the center block first and then sew the diagonals that attach each fan piece to the other???
Do I (please say no) attach all 4 fan pieces/frame pieces to each other and then somehow attach the center block to the center????
Help, please, so I get the seams and all right the first time and don't have to undo all this lovely sewing or start from fresh again. Thanks a million!!!Comment
-
Heather, you may have to be a bit patient today, as Fridays are usually slow Forum days! I guess most of us are doing a catch up stuff, before the week end arrives. I have a couple of ways I might do this block, but may not be able to explain it well, and am not sure you know what a Y seam is. I would do what you said in the first paragraph, but the 3rd and 4th would also be sewn together before sewing it to the square. (Y seam at the corner of the square.) And then I'd sew the 2 remain sides together, with a Y seam at the square. (A Y seam is a seam that you do not sew the last 1/4" {and back tack it} of each of 3 seams that come to that junction. I'd like to see how Margo and Annis would do it, though!
Dawn
In beautiful Northwest MontanaComment
-
Thanks, Dawn. I think I understand a Y seam (you explained it well!) but just to clarify -- I'd sew all 4 frame pieces together (to make the frame) then insert the center square and attach it to the frame (1 side at a time, and at that point attaching/sewing the unsewn bits of the Y seam from the other pieces??)?Originally posted by Scoopie
I think that makes sense to make sure the frame is squared up, even though it sounds hard
Will wait, patiently, for others to chime in and clarify before I start. Thanks for the heads-up that Friday is a slow day
Comment
-
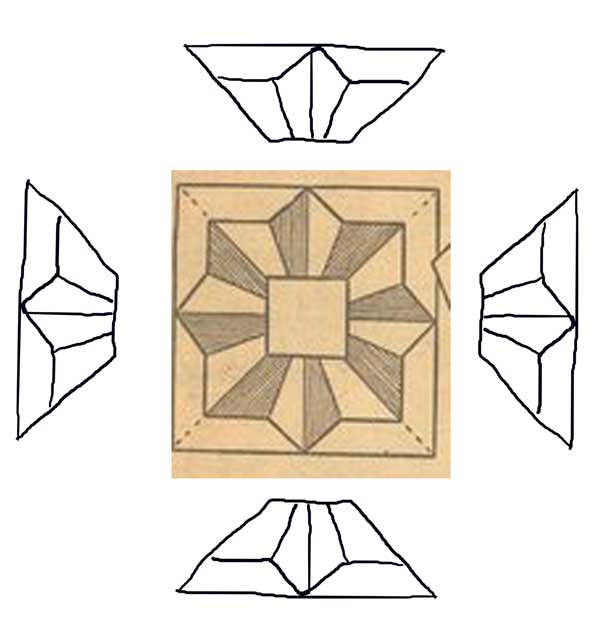
Heather, I would make four units like I've sketched. I would attach two units to opposite sides to the center square, then set in the remaining two units.
You might want to watch Alex's video about piecing a Lemoyne star block for an idea of how to handle those "Y" seams for the last two units, but for some reason it is not available right now. I'll check with Capt'n John and get back to you.
In the meantime, if you are piecing by hand, I assume that what you have already assembled is stitched right on the drawn lines and your stitches do not extend into the seam allowances. That's exactly what needs to be done.
If you have already stitched the pairs of fans together, you can either unsew some of them, or go ahead and sew them all together and set in the center square in the middle of the doughnut! It's really not as hard as it sounds like you think it may be!!
One seam at a time! You can do this!
It's Not What You Gather, But What You Scatter
That Tells What Kind Of Life You Have Lived !Comment
-
Margo always is such a help! She's always able to give us great pictures.
This is just to clarify what I wrote before, if you chose to do it this way. I probably didn't expliain it well, but let's try this: Call the sides #1, #2, #3, and #4. Sew #1 to #2, ending seam 1/4 from the end of fabric that will attach to the center corner, backtack then sew that unit to two sides of the center square, one side at a time, beginning and stopping 1/4" after/before each of the corners of the square, back tack at start and ending. Sew #3 to #4, then sew to the square, same as above. Sew last two seams to complete block.
Your "unsewn bits" as you called them, are the means of turning your unit from sewing in one direction to sew in another, usually around a corner. Kind of like "clipping" a seam to curve it around a corner. Think of this unsewn portion of the seam as the "clip."
Dawn
In beatiful Northwest MontanaComment
-

-
-
-
-
-
-
-
-
-
-
-
-
-
-
-
-
-
-


What's Going On
There are currently 8317 users online. 213 members and 8104 guests.
Most users ever online was 45,077 at 12:30 PM on 02-01-2026.
Working...
Comment