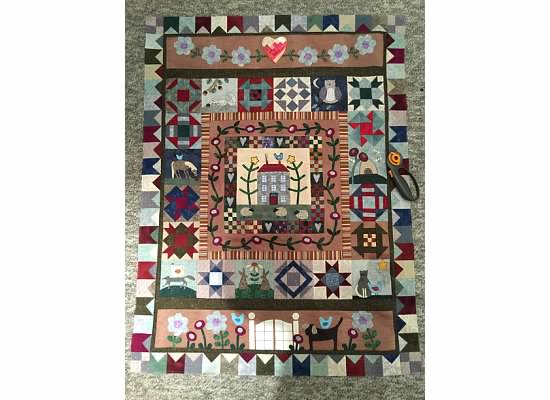
Quilting Forum

Announcement

Collapse
No announcement yet.

Latest Forum Posts

Collapse

Trending Forum Posts

Collapse

  • Happy Dance! I won ribbons!
    Home from the Maine Quilts show where my Color my World quilt, rename ‘Home,’ received 3 ribbons. I’m overwhelmed...
  • What I learned
    Well, here it is, the end of 2022, and I finally have finished my 2021 BOM quilt! I apologize that the photo is not centered....
  • Late at this but having difficulty
    Hi There,

    I hope you can help me. I know I'm very late in getting to this point but life is finally allowing...
  • Adding house numbers
    I'm quite behind on my BOM, but now have all the tall buildings of the outer ring done. I would like to add some house...
  • Ahhhhh.. almost done! Have a question!!
    Hi all.. I am behind in my Color My World and just starting the skyscrapers... Does anyone have the finished size (with...
  • My Colorful World With Parks by Duffy
    My quilt is finish
  • Printing for paper piecing question
    For anyone paper piecing, is your quarter inch a tiny bit larger? When I’m trimming up the finished building, I line...
  • Paper piecing color my world…anyone else?
    I decided early to do paper piecing instead of the wax…I’m more comfortable . However, I have a few questions…anyone...
  • Video Access
    Will we have access to the Color My World videos after December 31st? I can't seem to find info on this.
  • New to The Quilt Show
    I am BRAND NEW to the Quilt Show and fell in love with this pattern. I downloaded all of the instructions. My concern is......
  • How to download pattern?
    I'm a new-ish star member and would like to download the "Color My World" pattern...but I can't find where to...
  • Quilting color my world
    See how I quilted Color My World and the added surprise quilting in Wendy’s border:

    https://bbquiltmaker.b...
  • Getting outer circle to lie flat
    Hello - I know someone has solved this problem...I seem to remember a question arising when we put the inner circle together...
  • Great new way to see all the photos!
    Cap'n John showed me a new feature--you can see all the photos posted on any particular topic--at once.

    Open...
  • Color My World Pattern - Download Heads Up
    I know Barbara has reminded us to download all files prior to the end of the year. I finished my downloads today and decided...
  • Color my world — your finish here
    Please use this topic to share your FINISHED top or quilt here. This will make it easy to see all the great quilts everyone...
  • Quilt is complete. Fun!
  • One World — This is Brilliant!
    Sunday Sew and Sews met today. Pam R. came up with a brilliant way to make One World—she used striped fabric!...
  • Loading...
  • No more items.

Half-Size Measurements

Collapse
X
  • Filter
  • Time
  • Show
Clear All
new posts

  • Profile Image
    replied
    Denise, it is beautiful!!!!!

    Glad I could help.

    Andrée

    Leave a comment:


  • Profile Image
    replied
    Congratulations -- your quilt is lovely. Cheers, Jo

    Leave a comment:


  • Profile Image
    replied
    IT'S FINISHED!!

    I certainly expected to be done this past weekend at retreat but alas, it took a little longer because I had no internet connection and Andree was not available to help me with my measurements so I had to wing it and of course a little reverse sewing

    I LOVE it. As you can see the rotary cutter on the right side is for scale. Thanks to all who posted throughout the year and especially Andree who emailed me the paper pieced pattern and all her hard work with pictures and calculations. I could have not done it without her!

    Here she is!


    Leave a comment:


  • Profile Image
    replied
    Denise - your blocks look great!
    Barb :-)

    Leave a comment:


  • Profile Image
    replied
    Denise
    That is very well done! Can't wait to see it all together!

    Andrée

    Leave a comment:


  • Profile Image
    replied
    Great well done, on the home run now

    Leave a comment:


  • Profile Image
    replied
    I try so hard to add pictures but I do it so infrequently I forget how to do it.

    Here is a link to my blocks - 1/2 size. Only 1 more to go then I can start the borders.

    https://thequiltshow.com/community/member-groups/viewgroup/100005-2015-tqs-bom

    Leave a comment:


  • Profile Image
    replied
    Thank you Andree, this looks great. Will have a burst on mine soon

    Leave a comment:


  • Profile Image
    replied
    Andree thank you so much for all. Your hard work figuring the measurements, testing them and providing the write up with pictures. I was able to do 6 blocks today with your help.

    many many thanks!

    Denise

    Leave a comment:


  • Profile Image
    replied
    Andree - looks great!
    Three more applique blocks to go then I'm ready for the borders.
    Barb

    Leave a comment:


  • Profile Image
    replied
    My final border is finished. The top and bottom should measure 28-1/2 ", but mine measures 28-7/8 "... So, my 1/4 inch is a "hair" too scant... Same with the 2 sides. I'll leave it like this. The "plain" row between the blocks and this border will be used to make everything fit together! :cheer:


    Now, back to appliqué...
    Andrée

    Leave a comment:


  • Profile Image
    replied
    Andrée, you are wonderful!

    Barb in Alabama
    42 degrees this morning, blegh

    Leave a comment:


  • Profile Image
    replied
    Awesome Andree!
    Barb :-)

    Leave a comment:


  • Profile Image
    replied
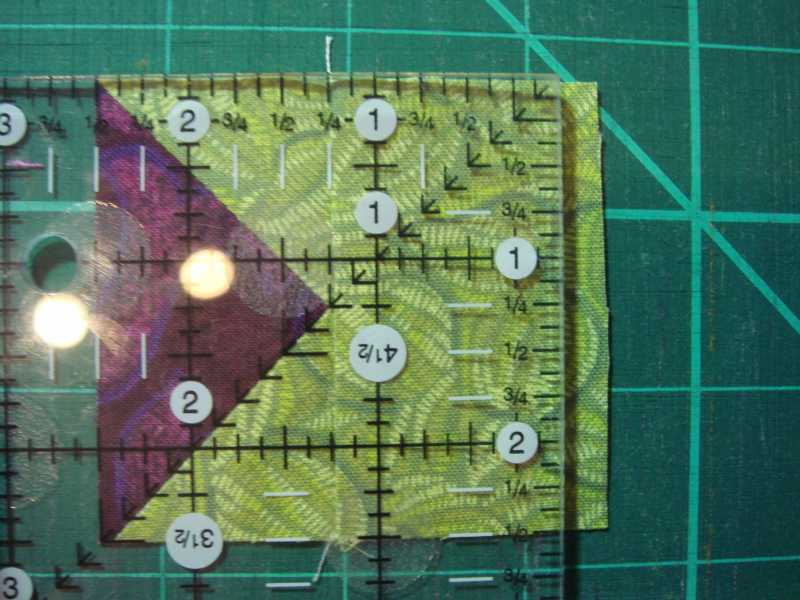
    I used a square ruler with a diagonal at the corner. We need to cut the flying geese to 1-1/2" x 2-1/2" from edge to edge.

    With the "nose" of the geese going away from you, align the diagonal line of the ruler on the geese, with the 1-1/4" mark at the center tip.
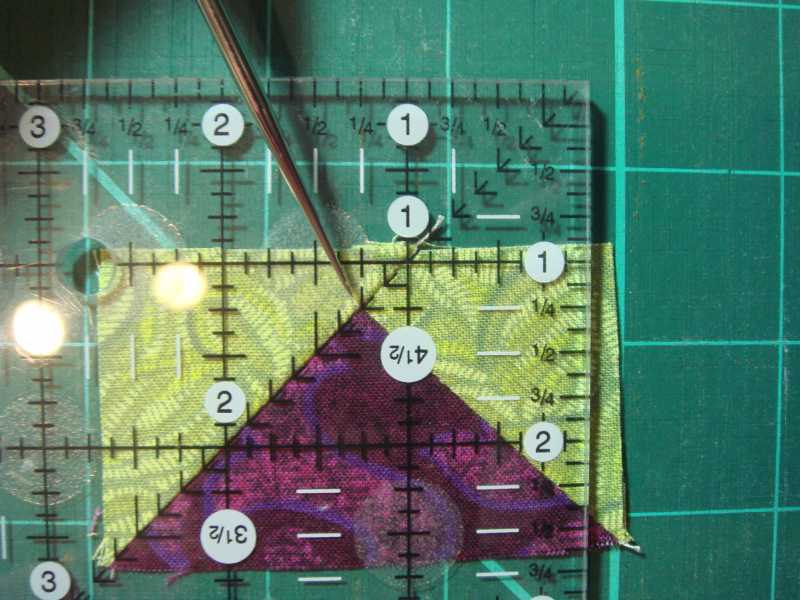


    Cut on the right.
    Then, turn the geese around, align the diagonal line of the ruler with the geese, and measure 2-1/2". The corner of the ruler will be on the seam.


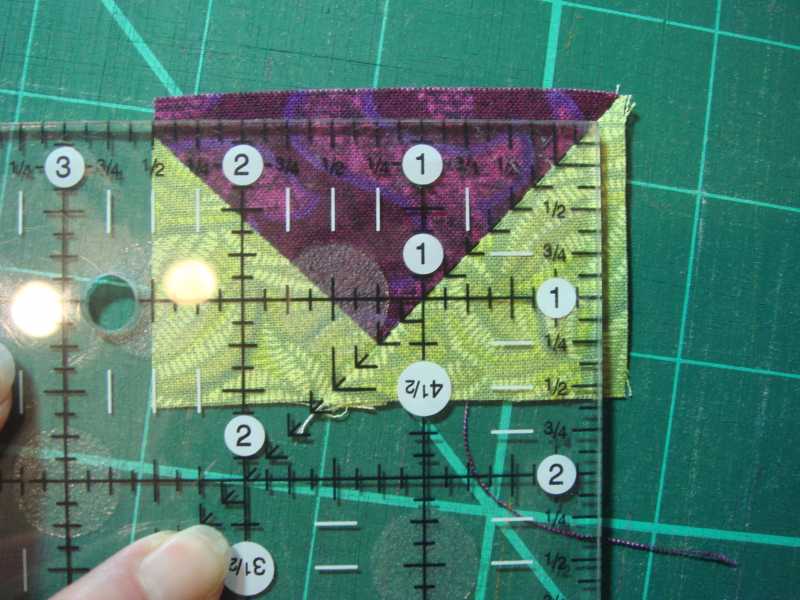
    Cut the right and the top part.
    Turn the geese sideways (nose to the right). Measure 1-1/2".


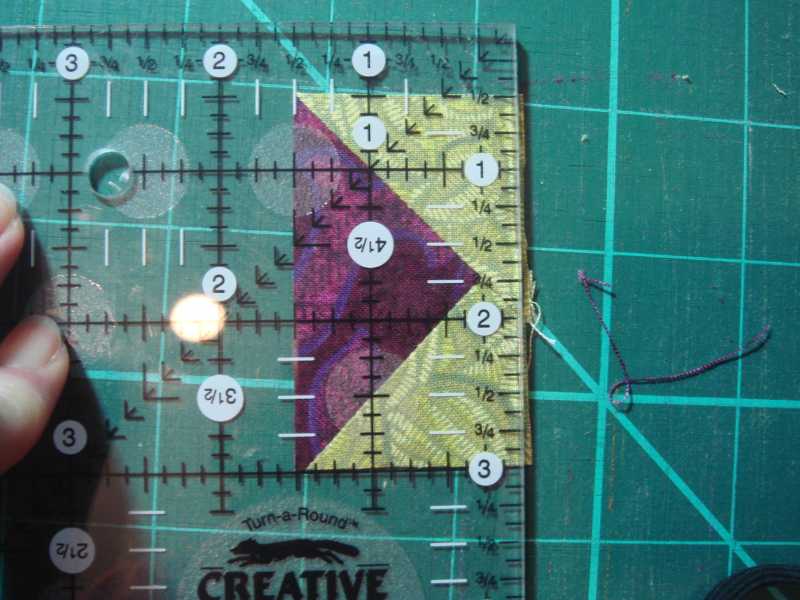
    Cut the right part. You have a flying geese 1-1/2 x 2-1/2.

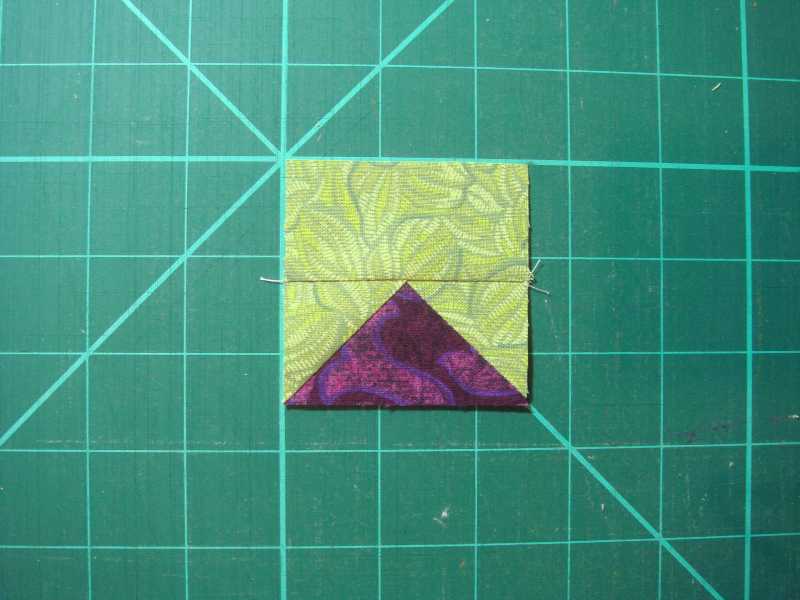
    Sew the 2-1/2 x 1-3/4 rectangle to the flying geese, and press to the rectangle.

    Align the "rear end" of the geese with the 2-1/2 line.


    Cut.
    You have a 2-1/2 x 2-1/2 block...


    You will need 14 each at the top and bottom, and 19 each side.

    I'm almost done.... :cheer:

    Andrée

    Leave a comment:


  • Profile Image
    replied
    FINAL BORDER
    Once all the blocks are assembled, there is one simple 1/2" finished "plain border" all around. At this point, the quilt measures 38-1/2" x 28-1/2" from raw edge to raw edge.
    You will need 66 "flying geese" blocks and 4 "four-patch" for the corners. Each measures 2-1/2" x 2-1/2".
    Here is how I did each "flying geese" block. It's oversized, and then cut to correct measurement for accuracy.
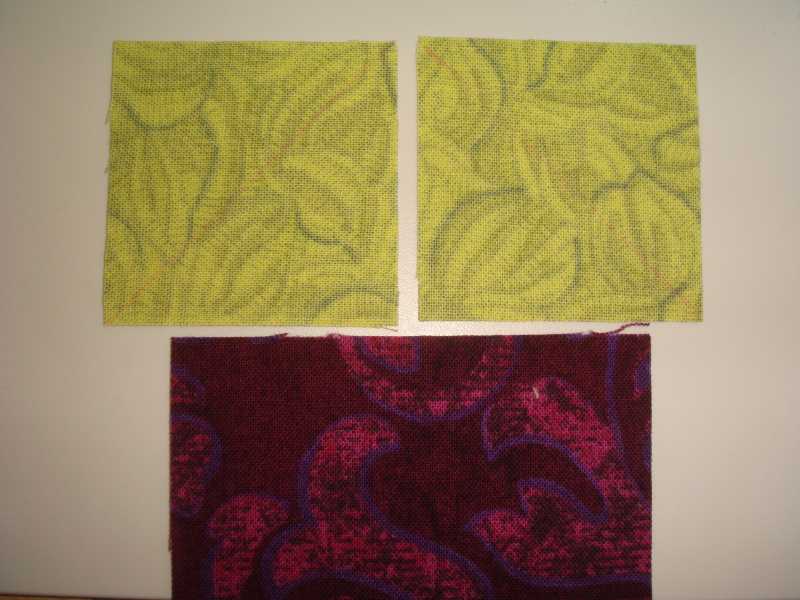
    I used strips at 1-3/4"in each colors.
    1 rectangle 2-1/2 x 1-3/4 (for the "outside part" (not shown)
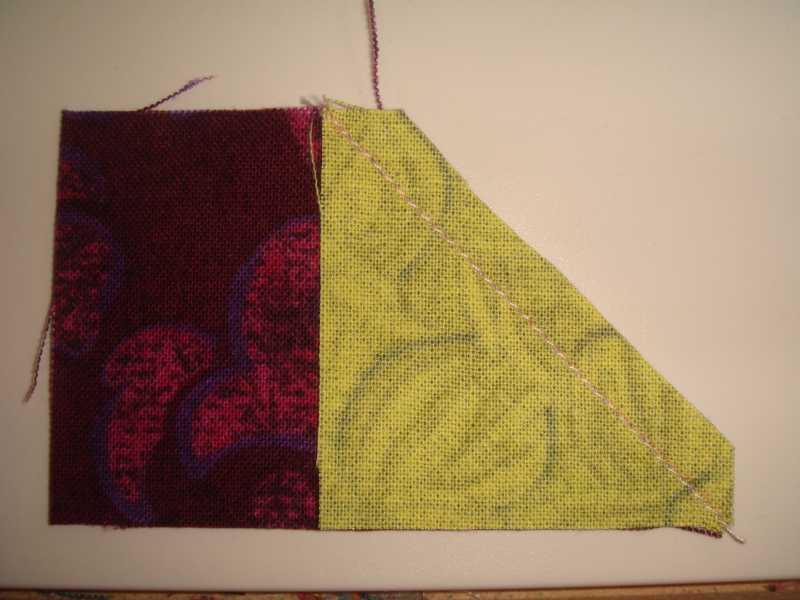
    1 rectangle 2-7/8 x 1-3/4 for the "geese"
    2 squares 1-3/4 x 1-3/4 for the "sky"
    Draw a diagonal line non each squares.


    place a square at the end of the 2-7/8 rectangle. Sew on the line.


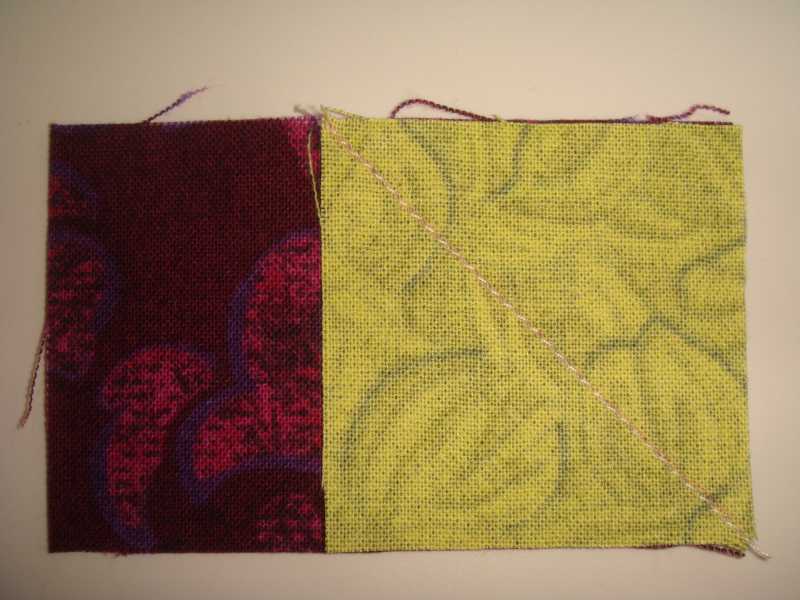
    Cut the seam allowance to 1/4".


    Press seam allowance towardsthe "sky" and place the 2nd square at the other end. Sew on the line.


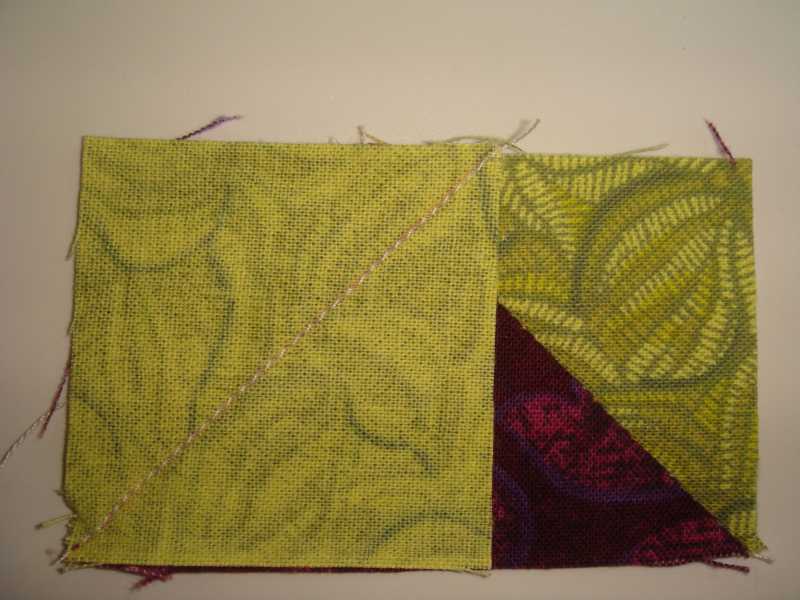
    Cut the seam allowanceto 1/4"


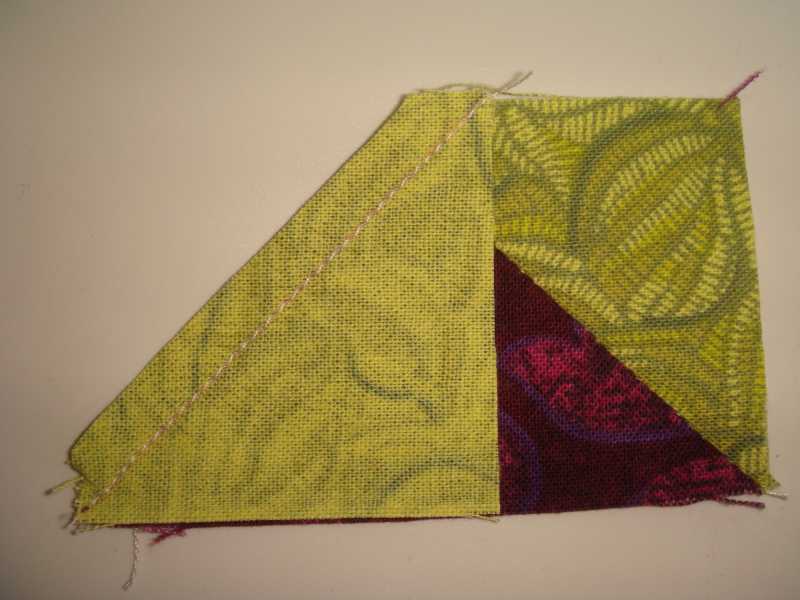
    Press towards the "sky" (outside).
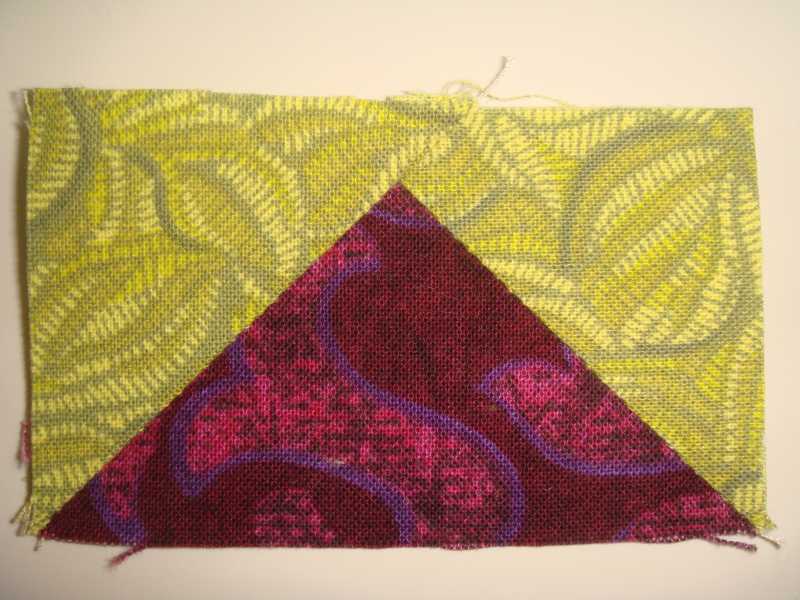


    Next post - how to cut.

    Leave a comment:

What's Going On

Collapse

There are currently 2899 users online. 164 members and 2735 guests.

Most users ever online was 20,162 at 02:06 PM on 02-20-2024.

Forum Stats

Collapse

Topics: 8,310   Posts: 156,191   Members: 27420   Active Members: 1,252  
Welcome to our newest member, Carol Patrick-daisypat.

Latest Topics

Collapse

Trending

Collapse

There are no results that meet this criteria.

Working...
X