
 ...
...
Latest Forum Posts
-
Month 7 finished! Unintended 'design choice' on bottom border - should have read instructions twice then sewn once!...
-
Here’s my progress so far. I am not 100% pleased with my log cabins, but I don’t think I’ll change them. The fabrics...
-
Great job on your appliqué.
-
Beautiful !!!
-
This looks great! I love what you did with the green fabric. The middle is very colorful and I love the design !
-
Wow, this looks amazing!
-
Lovely! And what a terrific back, truly a two-sided quilt.
-
Couple of years late, but enjoying this one so far!
-
I got my quilt back from the quilter’s today. I like doing double sided quilts, so it took a while to complete this....
-
Thank you Barbara, I'll look for that tape.
Last year I moved my quilting set up from a finished attic to a... -
I use a Black+ Decker hardware tape measure. Fold the strip in half, measure half the length needed, don’t forget the...
-
Accurately cutting the brown border.
I measured the top and it seems correct, but my first two borders are... -
There is one corner that I do not liking the color and will trade out bottom left for a square in a square log cabin half...
-
Im having fun!
-
Woo hoo! The updated file worked. As an FYI - I use EDGE as my browser, and I always download first then call up the download...
-
Ready for next month!
-
These little 9-patches for the 1/2 size version...Finished size seems to be 1 3/4". Do I need to make my seam allowance 1/8" to achieve this? Having trouble making it work. The Billie Lauder method doesn't work for me because the 1/4" seam allowance makes them too small. Any help greatly appreciated.
-
What kind of stiff plastic packing tape? I am having trouble imagining how that works.Originally posted by "twiglet" post=125653
Comment
-
Rita, I'm so sorry I haven't been able to post earlier. The half size 9 patch finished must be 1-1/2 inch. From raw edge to raw edge, they will be 2". Each of the squares have to be cut 1" which includes a 1/4 " seem allowance.Originally posted by "Reetzbobeetz" post=125667
Hope that helps.
AndréeComment
-
Mine came out 2 in raw edge to raw edge. Will try and post pictures when I get home tonight.
DeniseComment
-
I mean the stiff stuff that's stapled round boxes http://www.rgbstock.com/bigphoto/mslsewg/wrapped,+sealed+and+boundOriginally posted by "loise98" post=125668
Perhaps it's a uk thing. I cut long strips that hold the shape and you use as pressing bar as lynette did.
Mug rugger and lounge lizardComment
-
I was wondering what you were talking about...Aren't you clever ?! I never would have thought of
using that stuff !! :P :lol:
Comment
-
I'm just tight :lol:
Mug rugger and lounge lizardComment
-
I bought KK Buckley's Perfect stems as I wanted to make the tiny 'Perfect Stems'. I had tried to order Perfect Stems from a UK site but was told by the company that they didn't stock Perfect Stems, because cable ties work just the same. I was surprised to find when my Perfect Stems arrived from America, that they indeed do look exactly like .... cable ties. Wendy your stiff packing ties will work just as well, I wish I had saved mine from all the boxes at Christmas.
PamComment
-
I have now decided to do a full sized version of the centre block but I am a little confused. The instructions for the background fabric say to cut two strips 6" x 10 1/2" for either side of the house. But on the full-size printout (which I have checked and is the right size) the width from house to outer edge is only 5" which would suggest cutting fabric at 5 1/2" instead of 6". Has anybody else got this far and am I just reading things wrong? So my total width is now 19 1/2" instead of 19" and I have already cut the long background strip for the top above the chimneys as per instructions which is 19".
Comment
-
Rita,
The only thing I can think of is that maybe these pieces are some of those intended to be oversized and trimmed later, to allow for shrinkage after the embroidery is done. ???
I noticed in the Introductory packet - "Cutting - Wherever practical, background patches for applique are cut oversize and will be trimmed to the exact size needed after the applique is complete.
JudyComment
-
Those pieces are cut oversize - it is mentioned with an asterisk.
The full size version of the house block is 18 x 18 finished - so it will need to be cut at 18-1/2 at one point. I think this part is missing before the bottom part is added (in the first paragraph of page 6) - I think :unsure:
AndréeComment
-
Yes I think you are both right. It's just a bit off-putting to have the one section narrower than the other. I can see that I will have enough there to cut it down to 18 1/2", phew! I found the directions to square the centre block to 18 1/2" x 18 1/2" on page 6 of the instructions. Thanks for the rapid responses. :cheer:Comment
-
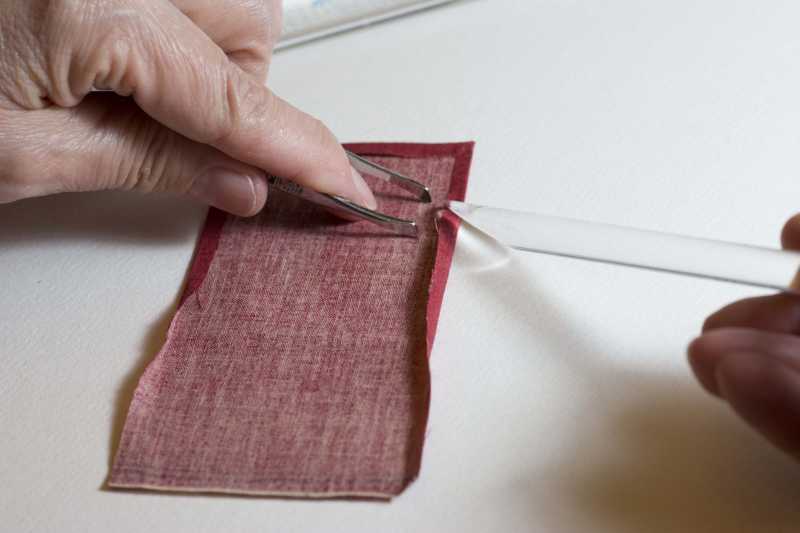
I have too much carpal tunnel and arthritis in my hands to hold the thin steel Appliquick. In case there are others out there with similar problems, I am sharing my solution.
I use a watercolor/acrylic artist brush with an aquarelle handle. It is bevelled, rounded on one side and flat on the other. It is intended for burnishing, etc. I use it just like the Appliquick tool, but it is bigger and easier for me to handle than a thin steel rod would be. I turn the applique edge with the rounded end, and then press it with the flat side (similar to burnishing.)
I found that I could use a pair of tweezers to hold the applique in place. This is an old pair of tweezers that do a terrible job of tweezing eyebrows, but work just great for this. I hold them with sharp points down on the fabric. I use my index finger to keep them stable. (see photo).
When finished, I can pick up the applique piece with the tweezers without getting my hands all covered with sticky glue.
One advantage of using this brush is that if the glue gets dry too fast, then I can moisten it - just a tad - with the damp tip of the brush, and the glue is workable again. Washable glue washes right out of the synthetic taklon bristles. (I would never try this with an expensive sable brush.)
My brush is a Winsor and Newton 995 series, although other manufacturer's make them with aquarelle handles also.
I hope this helps someone else.Comment
-

-
-
-
-
-
-
-
-
-
-
-
-
-
-
-
-
-


What's Going On
There are currently 8040 users online. 371 members and 7669 guests.
Most users ever online was 45,077 at 12:30 PM on 02-01-2026.
Working...
Comment