Quilting Forum

Announcement

Collapse
No announcement yet.

Latest Forum Posts

Collapse

  • YOUR Completed LAUREL RIDGE
    My top pieced together with borders to be added. I had to recut spacer strip to 3 ins to fit correctly. Enjoyed making this...
  • MONTH 11 - Show Your Progress Here
    The nice thing about this is the way it's put together in 9 sections. Get done what you can, as you can. Just like we eat...
  • MONTH 11 - Ask Questions Here
    Sue, my LIVE broadcasts remain on YouTube in The Quilt Show channel. My blogs remain indefinitely. Lynn's videos will only...
  • MONTH 11 - Show Your Progress Here
    I had to post a picture of my quilt blocks on my design wall, which is way to small! All the blocks are done but not on...
  • MONTH 11 - Ask Questions Here
    Hi Barbara-
    This has already been asked I'm sure-will your videos and Lynns be available in 2026? If not can I save...
  • MONTH 11 - Show Your Progress Here
    Thank you so much Lynn. The quilting is certainly inspirational. I will also check your blog.
    Thanks again for Laurel...
  • MONTH 11 - Ask Questions Here
    Lorry, Thank you for your comments;. I was able to find the blue parchment.
  • YOUR Completed LAUREL RIDGE
    Thank you Barbara, I think I have almost all the colors in this quilt and I was not sure how it would turn out but I like...
  • MONTH 12 - Ask Questions Here
    Took a while to find it. The goose on the edge in the middle, far right, is turned around. The diagram on the left of that...
  • COLORING PAGE Ready!
    That border is made with two separate blocks, A and B.
  • MONTH 11 - Show Your Progress Here
    I am finished with the top except for the borders. I have to thank Lynn for all the wonderful tips,tricks and videos as...
  • COLORING PAGE Ready!
    What does the A and B mean on the coloring page?
  • MONTH 12 - Ask Questions Here
    If making Spring pattern, be aware that in Month 11 instructions, page 9 for Center Star has a placement error for on right...
  • MONTH 12 - Ask Questions Here
    I cut my spacer blocks 3 x 10 1/2 also. Perfect fit.
  • YOUR Completed LAUREL RIDGE
    It's beautiful and thanks for the photo on the bed.. It looks great there!
  • COLORING PAGE Ready!
    Yes, that is correct at the moment.
  • COLORING PAGE Ready!
    Barbara, I noticed on the coloring page that the numbers on the outline go up to 12. Is that telling us what we will be...
  • MONTH 11 - Show Your Progress Here
    Thank you, Pam. This quilt did teach a lot to many. I learned a few things!
    If you don’t get your avatar set up,...
  • Loading...
  • No more items.

Trending Forum Posts

Collapse

  • how much fabric for trees
    how much fabric is needed for trees...
  • Happy Dance! I won ribbons!
    Home from the Maine Quilts show where my Color my World quilt, rename ‘Home,’ received 3 ribbons. I’m overwhelmed...
  • What I learned
    Well, here it is, the end of 2022, and I finally have finished my 2021 BOM quilt! I apologize that the photo is not centered....
  • Late at this but having difficulty
    Hi There,

    I hope you can help me. I know I'm very late in getting to this point but life is finally allowing...
  • Adding house numbers
    I'm quite behind on my BOM, but now have all the tall buildings of the outer ring done. I would like to add some house...
  • Ahhhhh.. almost done! Have a question!!
    Hi all.. I am behind in my Color My World and just starting the skyscrapers... Does anyone have the finished size (with...
  • My Colorful World With Parks by Duffy
    My quilt is finish
  • Printing for paper piecing question
    For anyone paper piecing, is your quarter inch a tiny bit larger? When I’m trimming up the finished building, I line...
  • Paper piecing color my world…anyone else?
    I decided early to do paper piecing instead of the wax…I’m more comfortable . However, I have a few questions…anyone...
  • Video Access
    Will we have access to the Color My World videos after December 31st? I can't seem to find info on this.
  • New to The Quilt Show
    I am BRAND NEW to the Quilt Show and fell in love with this pattern. I downloaded all of the instructions. My concern is......
  • How to download pattern?
    I'm a new-ish star member and would like to download the "Color My World" pattern...but I can't find where to...
  • Quilting color my world
    See how I quilted Color My World and the added surprise quilting in Wendy’s border:

    https://bbquiltmaker.b...
  • Getting outer circle to lie flat
    Hello - I know someone has solved this problem...I seem to remember a question arising when we put the inner circle together...
  • Great new way to see all the photos!
    Cap'n John showed me a new feature--you can see all the photos posted on any particular topic--at once.

    Open...
  • Color My World Pattern - Download Heads Up
    I know Barbara has reminded us to download all files prior to the end of the year. I finished my downloads today and decided...
  • Color my world — your finish here
    Please use this topic to share your FINISHED top or quilt here. This will make it easy to see all the great quilts everyone...
  • Quilt is complete. Fun!
  • Loading...
  • No more items.

Half Square Triangles

Collapse
X
  • Time
  • Show
Clear All
new posts

    Half Square Triangles

    I do not know whether or not anyone has had this problem, but when I copied and finished the January section, it measured exactly right. Then, I copied the 1/2 ST for month 2 and set to sewing them. When completed, the sections were a very tiny bit shorter than they should have been. I checked my measurements again. Printed again and sewed one section - same result. Slightly smaller than it should have been even though I measured beforehand and the squares were exactly 1 inch. So I enlarged the pattern by 1% (which was bigger than the original pattern), sewed the same section AGAIN, and it was almost exactly right. - not quite, but almost. Can anyone tell me what is happening? The month one copies were perfect. If I have this problem every month with the paper piecing, and having to reduce and reduce, I'll be out of fabric long before I get very much done.

    https://bbquiltmaker.blogspot.com
    North Alabama, USA
    "I am a part of all that I have met" A. Lord Tennyson

    #2
    Did you use the same foundation paper for both? Some paper shrinks when pressed with a hot iron. I've had that happen with different vellum papers. I found Office Depot vellum to work the best for paper piecing.

    Comment


      #3
      Thank you. I did not! And I never thought about it. Daaaaaa!

      Comment


        #4
        OK! I wrote early last month. Now, I need some suggestions and/or help. I am now half way through my 3rd (yes,, third) redue of the HST from month 2. I have printed the patterns, measured them to be sure they are exactly the proper length, but when I get done, they are shorter than they should be. I have changed paper, turned off the steam on the iron, remeasured to be sure everything is right. But now I'm half way through the third attempt at one of the HST rows (four units), and already my pattern is measuring 1/16 shorter on each section. By the time I'm done, it will be at least 1/8 to short each; multiply that by four sections, I no longer have the correct length. What is happening? I'm about to give up on this BOM. I've been so excited about this beautiful quilt, but the frustration level is just about to spill over!!! H E L P !

        Comment


          #5
          Originally posted by "gsheirbon" post=140404
          OK! I wrote early last month. Now, I need some suggestions and/or help. I am now half way through my 3rd (yes,, third) redue of the HST from month 2. I have printed the patterns, measured them to be sure they are exactly the proper length, but when I get done, they are shorter than they should be. I have changed paper, turned off the steam on the iron, remeasured to be sure everything is right. But now I'm half way through the third attempt at one of the HST rows (four units), and already my pattern is measuring 1/16 shorter on each section. By the time I'm done, it will be at least 1/8 to short each; multiply that by four sections, I no longer have the correct length. What is happening? I'm about to give up on this BOM. I've been so excited about this beautiful quilt, but the frustration level is just about to spill over!!! H E L P !
          It's really hard to guess what you might be doing that would cause your pattern to shorten. I have to assume you are doing the paper-piecing correctly. Your finished HST should measure one inch. Since you checked the paper and turned off the steam, there are only two things that you could still tweak, if you are not already doing it:

          First, make sure your thread is at least a 50 weight thread or thinner--sometimes that eats up fabric. I use Aurifil 50 wt thread; I know others who use even thinner thread, like 60 weight (for example, Superior Bottom Line), and see if that helps.

          Secondly, and more importantly, are you pressing your seams right after you've made the seam or are you just finger pressing? I found that taking the time to actually press each seam with a hot iron every time you sew a seam when paper-piecing adds to accuracy. As soon as I sew the seam, I take it to the iron, press down on the unit to the count of "three", then press the seam open to one side. Some people can finger press effectively, but if your having a problem with size of the unit, that might be something to try.

          I hope someone else will pipe up with advice for you if my suggestions don't help. The BOM is too beautiful to give up. Hang in there! If there's a teeny bit of a discrepancy after you improve the size of your unit, you can make it up with the floater.

          Comment


            #6
            Thank you, thank you. It was the thread!!!!

            Comment


              #7
              Great tips, Renata. I was also going to suggest finer thread. Fat thread=thick seams and loss of fabric. Glad you figured it out.

              https://bbquiltmaker.blogspot.com
              North Alabama, USA
              "I am a part of all that I have met" A. Lord Tennyson

              Comment


                #8
                Originally posted by "gsheirbon" post=140427
                Thank you, thank you. It was the thread!!!!
                So glad it worked out for you! :cheer:

                Comment


                  #9
                  thicker fabric can affect the seams, also. I cut my squares to 1 inch larger than the finished size, then, when finished, cut them to size.

                  Comment


                    #10
                    Just how wide are the half-square triangle strips in Month 2? I ask because the printing software has a default of "Shrink oversized pages", which resulted in a month 1 center block about 2 inches smaller than the first sentence of month 2 instructions requires. Yikes! (must be less trusting in the future.) Reprinting at 100% is not consistent. So how wide should the strip be? So I have a goal?
                    Suggestion for TQS-Place a 1" scale square in the footer of each page as some other paper-pieced BOMs have (Jinny Beyer).

                    Comment


                      #11
                      I read some other threads that say the half-square triangles should finish 1 inch.

                      Comment


                        #12
                        On page 5 of Month 2 instructions it says the half square triangles are 1" finished. Your paper pattern should be precisely that size. Watch those settings when you print.

                        https://bbquiltmaker.blogspot.com
                        North Alabama, USA
                        "I am a part of all that I have met" A. Lord Tennyson

                        Comment


                          #13
                          Originally posted by "keyedup" post=141763
                          Just how wide are the half-square triangle strips in Month 2?
                          I am adding a bit to BBQuiltmaker's response because you asked about strip width and she answered with finished size.

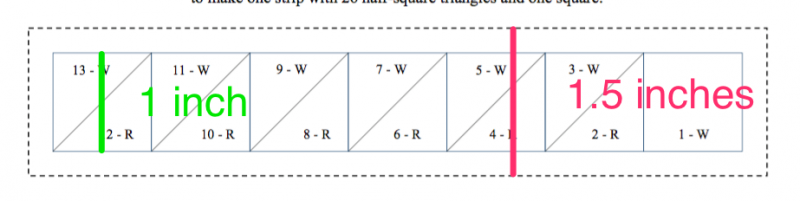
                          The thin blue lines on your Month 2 printout represent the finished size of your HSTs which is 1" this month. When you measure the distance between these lines, you should get one inch. (See the green line in the diagram below). The red line in the diagram measures from one dashed line to the opposing dashed line. That measurement should be 1.5" inches because you are adding a 1/4" seam allowance to both sides of the 1" finished HST.

                          Becky


                          Comment


                            #14
                            Originally posted by "keyedup" post=141763
                            Just how wide are the half-square triangle strips in Month 2?
                            I am adding a bit to BBquiltmaker's response because you asked about strip width and she shared the finished size of the HSTs.

                            The printed pages for this BOM show finished sizes using thin blue lines. As Barbara indicated, Month 2 HSTs should finish at 1". Your pages should print so the thin blue lines are 1 inch apart as indicated by the green line in the diagram. When cut and trimmed, the strips will be one-half an inch wider as you add 1/4" seam allowance to both sides. In the diagram, the red line shows the measurement from one dashed line to the opposing dashed line is 1.5" which is exactly what you should expect.

                            I hope this helps!

                            Becky

                            Comment

                            What's Going On

                            Collapse

                            There are currently 2535 users online. 284 members and 2251 guests.

                            Most users ever online was 89,239 at 07:38 PM on 06-08-2025.

                            Forum Stats

                            Collapse

                            Topics: 8,373   Posts: 157,042   Members: 28224   Active Members: 1,571  
                            Welcome to our newest member, Casimira Rodriguez-casimira.rodriguez.

                            Latest Topics

                            Collapse

                            • YOUR Completed LAUREL RIDGE
                              My top pieced together with borders to be added. I had to recut spacer strip to 3 ins to fit correctly. Enjoyed making this...
                            • MONTH 11 - Show Your Progress Here
                              The nice thing about this is the way it's put together in 9 sections. Get done what you can, as you can. Just like we eat...
                            • MONTH 11 - Ask Questions Here
                              Sue, my LIVE broadcasts remain on YouTube in The Quilt Show channel. My blogs remain indefinitely. Lynn's videos will only...
                            • MONTH 11 - Show Your Progress Here
                              I had to post a picture of my quilt blocks on my design wall, which is way to small! All the blocks are done but not on...
                            • MONTH 11 - Ask Questions Here
                              Hi Barbara-
                              This has already been asked I'm sure-will your videos and Lynns be available in 2026? If not can I save...
                            • MONTH 11 - Show Your Progress Here
                              Thank you so much Lynn. The quilting is certainly inspirational. I will also check your blog.
                              Thanks again for Laurel...
                            • MONTH 11 - Ask Questions Here
                              Lorry, Thank you for your comments;. I was able to find the blue parchment.
                            • YOUR Completed LAUREL RIDGE
                              Thank you Barbara, I think I have almost all the colors in this quilt and I was not sure how it would turn out but I like...
                            • MONTH 12 - Ask Questions Here
                              Took a while to find it. The goose on the edge in the middle, far right, is turned around. The diagram on the left of that...
                            • COLORING PAGE Ready!
                              That border is made with two separate blocks, A and B.
                            • MONTH 11 - Show Your Progress Here
                              I am finished with the top except for the borders. I have to thank Lynn for all the wonderful tips,tricks and videos as...
                            • COLORING PAGE Ready!
                              What does the A and B mean on the coloring page?
                            • MONTH 12 - Ask Questions Here
                              If making Spring pattern, be aware that in Month 11 instructions, page 9 for Center Star has a placement error for on right...
                            • Loading...
                            • No more items.

                            Trending

                            Collapse

                            There are no results that meet this criteria.

                            Working...
                            X