Announcement
Collapse
No announcement yet.
Latest Forum Posts
Collapse
-
I'm using the fold-back method we learned in Color my World.... I find it successful I do leave my paper attached for...
-
Newsprint could work for the corners. It is lighter than freezer paper. Try it to see how you like it.
The... -
Thanks, Barbara, for today’s live show. A few questions that got lost in the technical glitch…(1) A few times you mentioned...
-
I am not sure what you mean. I just checked Month 2, all 6 pattern parts show just the one listed in each file, 1-6. ...
-
Hi Barbara just checking when I went to print out Block 2 part 4 of 6 the pattern says part 1 of 6 is this correct do we...
-
All the patterns will remain available until December 31, 2026. Currently, Months 1 and 2 are up. Find them under LEARN:...
-
That works.
Vellum is so thin printers may have trouble pulling just one sheet at a time. -
No. Becky was using her stash and had to make do with a few fabrics. The kits have enough fabric you will not have to piece...
-
I Found the PROJECT/PATTERN TAB! “The how to” answer was on your BLOG thank you!
-
Just a comment. My printer didn't want to work with one piece of vellum. I put one piece of regular paper with one vellum...
-
Hello Barbara! My Name is Naomi. I’m a Star Member. I’ve never done a TQS’s BOM but I have enjoyed watching. I have...
-
Watched Becky's video again and noticed it appears that some of her strips are pieced, not whole pieces of fabric (possibly...
-
Great question, Terri. Becky removes the paper AFTER sewing all the center medallion parts together. Her videos for Month...
-
Hello Barbara, excellent information in today’s month two Live. Thank you for sharing!
Quick question: When is the... -
My blog for Month 2 is up. Read it AND watch the Month 2 Video BEFORE you begin:
https://bbquiltmaker.blog... -
Until January 31 they are all on the second page of Laurel Ridge:
https://thequiltshow.com/learn/category/... -
I only found two installments of the library horse riders. We’re there more installments and where are they. Thank you
-
Please use this TOPIC to share photos of your progress.
If the photo doesn't appear it is most likely too large--resize... - Loading...
- No more items.
Trending Forum Posts
Collapse
-
how much fabric is needed for trees...
-
Home from the Maine Quilts show where my Color my World quilt, rename ‘Home,’ received 3 ribbons. I’m overwhelmed...
-
Well, here it is, the end of 2022, and I finally have finished my 2021 BOM quilt! I apologize that the photo is not centered....
-
Hi There,
I hope you can help me. I know I'm very late in getting to this point but life is finally allowing... -
I'm quite behind on my BOM, but now have all the tall buildings of the outer ring done. I would like to add some house...
-
Hi all.. I am behind in my Color My World and just starting the skyscrapers... Does anyone have the finished size (with...
-
My quilt is finish
-
For anyone paper piecing, is your quarter inch a tiny bit larger? When I’m trimming up the finished building, I line...
-
I decided early to do paper piecing instead of the wax…I’m more comfortable . However, I have a few questions…anyone...
-
Will we have access to the Color My World videos after December 31st? I can't seem to find info on this.
-
I am BRAND NEW to the Quilt Show and fell in love with this pattern. I downloaded all of the instructions. My concern is......
-
I'm a new-ish star member and would like to download the "Color My World" pattern...but I can't find where to...
-
See how I quilted Color My World and the added surprise quilting in Wendy’s border:
https://bbquiltmaker.b... -
Hello - I know someone has solved this problem...I seem to remember a question arising when we put the inner circle together...
-
Cap'n John showed me a new feature--you can see all the photos posted on any particular topic--at once.
Open... -
I know Barbara has reminded us to download all files prior to the end of the year. I finished my downloads today and decided...
-
Please use this topic to share your FINISHED top or quilt here. This will make it easy to see all the great quilts everyone...
- Loading...
- No more items.
Pieced Border in EQ7-how to piece-NOW with progress photo
Collapse
X
-
-
-
-
Filter
-
Administrative
new posts
-
Dividing the diamond into two triangles is certainly a valid way to attack this. As with all things quilting, there are many ways to do it and different ways will work better for different people since we're all put together differently, too.
You don't really save yourself on the bias by dividing things into rectangles since that bias angle doesn't change. The biggest help to handling that bias, just talking about fabric direction and not other tricks like starch and freezer paper, is to align the long edge of the border with the selvage edge of the fabric to get the most stable grain along that long edge. So, each piece would be cut to match that alignment. But adding seams can make the construction easier in a couple of ways. First, it can make it more understandable which ends up being a very important factor. You definitely have to be able to see how it goes together before you can put it together! Secondly, it can provide opportunities to use larger pieces of fabric for the piecing and then trim the components down to the proper size to make the odd angles easier to get right. And there are probably other advantages that I'm not seeing right now.
I think it's great that you have the ability to break down the piecing and think of alternative ways to put things together to get what you want in the end! That's something that has taken a lot of practice for me and I'm often stumped with one of these problems until someone else shows me an easy solution!
Nancy
- IP
-
Yes, this is how I do all my paper piecing. However, I don't know how to "edit the border, then single out the area you want to print on paper in the size you need". Can you talk me thru this of selecting just the pink/yellow combo to print on freezer paper?Originally posted by cjbeghttp://www.twiddletails.com/store/index.php?main_page=page&id=21
This link is a tutorial on a folded freezer paper piecing that works really well. I would print out a few of the yellow/pink triangle sections and reuse them. thats the beauty of freezer paper. It can be used multiple times. You should be able to go into EQ7 and edit the border, then single out the area you want to print on paper in the size you need. Cut your freezer paper so it will feed through your printer.
If you only make templates of the diamond shape and add the yellow, make sure you starch the fabric really well.Jules~
@julesquilts on IG
working farm wife and quilter in the off-seasons
Tired.
Modern quilter, QOV volunteer, Improv, FPP w/o stitching on paper, freehand quilting on my long-arm.
BERNINA 790 Pro, Elna Serger, Handi Quilter Fusion, 3 FW, a lot of old Singers and other vintage and antique machines (25+).
- IP
Comment
-
Nancy, thank you for talking through this with me. I hope you can tolerate one more question/clarification....Originally posted by rehakDividing the diamond into two triangles is certainly a valid way to attack this. As with all things quilting, there are many ways to do it and different ways will work better for different people since we're all put together differently, too.
You don't really save yourself on the bias by dividing things into rectangles since that bias angle doesn't change. The biggest help to handling that bias, just talking about fabric direction and not other tricks like starch and freezer paper, is to align the long edge of the border with the selvage edge of the fabric to get the most stable grain along that long edge. So, each piece would be cut to match that alignment. But adding seams can make the construction easier in a couple of ways. First, it can make it more understandable which ends up being a very important factor. You definitely have to be able to see how it goes together before you can put it together! Secondly, it can provide opportunities to use larger pieces of fabric for the piecing and then trim the components down to the proper size to make the odd angles easier to get right. And there are probably other advantages that I'm not seeing right now.
I think it's great that you have the ability to break down the piecing and think of alternative ways to put things together to get what you want in the end! That's something that has taken a lot of practice for me and I'm often stumped with one of these problems until someone else shows me an easy solution!
Nancy
If there was a diamond being cut out, wouldn't more of the edges be going in the direction of the bias? You'd want the length of the diamond, point to point, to be the part that parallels the selvage, right? But that would make every outside edge a bias edge, yes?
So if you halve that diamond into two triangles, couldn't you now make one side of the triangle the parallel edge and then gain at least one non-bias? If you did the yellow triangle that way, too, then the 2 edges that join the blue could both be straight of grain, couldn't they, and if so, wouldn't that help some?
Or is that just really not a good solution for cutting those pieces? You'd have to leave the blue so that the outside is straight of grain and the bias is where it joins the pink/yellow, so maybe you'd have to do the same on the yellow...but if even getting one edge of the pink to be a straight of grain wouldn't that help join the 3 pieces together? And then since the joined bits would be rectangles so doing a short seam there, wouldn't there be less stretching of the bias edges? Or not really?
I am following you, and I am learning, just trying to clarify in my mind in case I face this one day. Thank you for your patience in talking this through with me!Jules~
@julesquilts on IG
working farm wife and quilter in the off-seasons
Tired.
Modern quilter, QOV volunteer, Improv, FPP w/o stitching on paper, freehand quilting on my long-arm.
BERNINA 790 Pro, Elna Serger, Handi Quilter Fusion, 3 FW, a lot of old Singers and other vintage and antique machines (25+).
- IP
Comment
-
In my estimation the longest edge of the outside triangle shape is about 24". Unless you have a printer with a banner setting that would be hard to do. I'm with Margo that since these pieces are so large it would be just as easy to use templates as to sew them on paper. Using starch and cutting the long outside edge on the lengthwise grain of the fabric will help.
- IP
Comment
-
If you really want to paper piece the pink/yellow sections, you can easily draw a copy on graph paper if you know the finished width and height. Draw the finished triangle shape first. Then draw it again in the other direction which will give the lines for the pink diamonds. Erase the extra lines outside of the first triangle. Then cut some pieces of freezer paper or yellow quilting paper the same size, pin or staple the graph paper drawing to the stack and sew on the lines with a large needle and no thread. That will give you multiple templates without having to draw or print them.
- IP
Comment
-
Yes, I think this would be best! Thank you!! I have a bit more work until I get to piecing these borders so at least I get to rummage it in my mind for a bit. That always helps me.Originally posted by ajclappIf you really want to paper piece the pink/yellow sections, you can easily draw a copy on graph paper if you know the finished width and height. Draw the finished triangle shape first. Then draw it again in the other direction which will give the lines for the pink diamonds. Erase the extra lines outside of the first triangle. Then cut some pieces of freezer paper or yellow quilting paper the same size, pin or staple the graph paper drawing to the stack and sew on the lines with a large needle and no thread. That will give you multiple templates without having to draw or print them.
Jules~
@julesquilts on IG
working farm wife and quilter in the off-seasons
Tired.
Modern quilter, QOV volunteer, Improv, FPP w/o stitching on paper, freehand quilting on my long-arm.
BERNINA 790 Pro, Elna Serger, Handi Quilter Fusion, 3 FW, a lot of old Singers and other vintage and antique machines (25+).
- IP
Comment
-
You could do that, but in the end you're in better shape if you have the entire length of the border following the most stable grain line of your fabric since that border is helping to contain your whole quilt. At least that's my opinion. (Remember that all opinions are valid and you need to pick the one that works best for you. Your choices are just as valid as anyone else's.)Originally posted by Learning-As-I-GoNancy, thank you for talking through this with me. I hope you can tolerate one more question/clarification....Originally posted by rehakDividing the diamond into two triangles is certainly a valid way to attack this. As with all things quilting, there are many ways to do it and different ways will work better for different people since we're all put together differently, too.
You don't really save yourself on the bias by dividing things into rectangles since that bias angle doesn't change. The biggest help to handling that bias, just talking about fabric direction and not other tricks like starch and freezer paper, is to align the long edge of the border with the selvage edge of the fabric to get the most stable grain along that long edge. So, each piece would be cut to match that alignment. But adding seams can make the construction easier in a couple of ways. First, it can make it more understandable which ends up being a very important factor. You definitely have to be able to see how it goes together before you can put it together! Secondly, it can provide opportunities to use larger pieces of fabric for the piecing and then trim the components down to the proper size to make the odd angles easier to get right. And there are probably other advantages that I'm not seeing right now.
I think it's great that you have the ability to break down the piecing and think of alternative ways to put things together to get what you want in the end! That's something that has taken a lot of practice for me and I'm often stumped with one of these problems until someone else shows me an easy solution!
Nancy
If there was a diamond being cut out, wouldn't more of the edges be going in the direction of the bias? You'd want the length of the diamond, point to point, to be the part that parallels the selvage, right? But that would make every outside edge a bias edge, yes?
So if you halve that diamond into two triangles, couldn't you now make one side of the triangle the parallel edge and then gain at least one non-bias? If you did the yellow triangle that way, too, then the 2 edges that join the blue could both be straight of grain, couldn't they, and if so, wouldn't that help some?
Or is that just really not a good solution for cutting those pieces? You'd have to leave the blue so that the outside is straight of grain and the bias is where it joins the pink/yellow, so maybe you'd have to do the same on the yellow...but if even getting one edge of the pink to be a straight of grain wouldn't that help join the 3 pieces together? And then since the joined bits would be rectangles so doing a short seam there, wouldn't there be less stretching of the bias edges? Or not really?
I am following you, and I am learning, just trying to clarify in my mind in case I face this one day. Thank you for your patience in talking this through with me!
And I tend to like to have as few seams as possible, as long as it doesn't make the piecing too difficult.
- IP
Comment
-
I'll give it a try. After you strip piece the yellow, pink and blue fabrics, cut the multi colored strip on an angle to form the Seminole style pieces that would alternate with the yellow and blue strips that are similarly strip pieced and cut on an angle. The extra seam would be where the blue pieces come together to form the larger triangles on the outer border. If this isn't clear, sorry this is the best I can do to clarify without drawing a picture.Originally posted by she-quiltsOriginally posted by NancyinSTLI would strip piece the pink and yellow, then cut the triangle shapes shown in side of the brown border. For the outer border, I would strip piece the yellow, pink, and blue and strip piece the yellow with blue, then cut the strips Seminole style--you will have a few extra seams, but less waste and it would be so much easier. I hope this makes sense to you.
This is making sense to me but can you explain this to me more for the outer border. I know Seminole style piecing but I'm not "seeing" how I'd do that. :? Thank you for helping me!

- IP
Comment
-
Okay, I just played with this on my EQ. What I did was go to Block edit and start with a blank square. Draw a diagonal line from one corner to the other, then only on one half draw a line vertically from top center to the diagonal line center, then horizontal to the side. You are making a square in the half triangle. under color, only color the half with the square and save in sketchbook. Now go to the quilt top and drop the new block into one of the solid triangles. Use the flip tool until you see the "diamond". Select that block and then you can print using paper piecing. It should be to whatever size you have planned. Voila, no measuring. :-)
- IP
Comment
-
YES!!Originally posted by cjbegOkay, I just played with this on my EQ. What I did was go to Block edit and start with a blank square. Draw a diagonal line from one corner to the other, then only on one half draw a line vertically from top center to the diagonal line center, then horizontal to the side. You are making a square in the half triangle. under color, only color the half with the square and save in sketchbook. Now go to the quilt top and drop the new block into one of the solid triangles. Use the flip tool until you see the "diamond". Select that block and then you can print using paper piecing. It should be to whatever size you have planned. Voila, no measuring. :-)
I got this to redo the block.
It isn't printing foundation pattern correctly but I can print the "block" and from there I can make my own FP foundation. Thank you!!
Jules~
@julesquilts on IG
working farm wife and quilter in the off-seasons
Tired.
Modern quilter, QOV volunteer, Improv, FPP w/o stitching on paper, freehand quilting on my long-arm.
BERNINA 790 Pro, Elna Serger, Handi Quilter Fusion, 3 FW, a lot of old Singers and other vintage and antique machines (25+).
- IP
Comment
-
I just worked on this a bit tonight. The blank places are where my exchange blocks will go. These blocks are starched and starched some more so those wonky bias (& otherwise!) seams won't be going anywhere. I'll do the yellow/pink blocks next and then be ready to set these blocks all together.
You understand this is a bit wonky layout w/o seams sewn yet.
The brown fabric is our theme fabric. We all had a FQ of it to use in our blocks we exchanged. This quilt will be super bright so you'll need your shades for other progress photos! :lol:
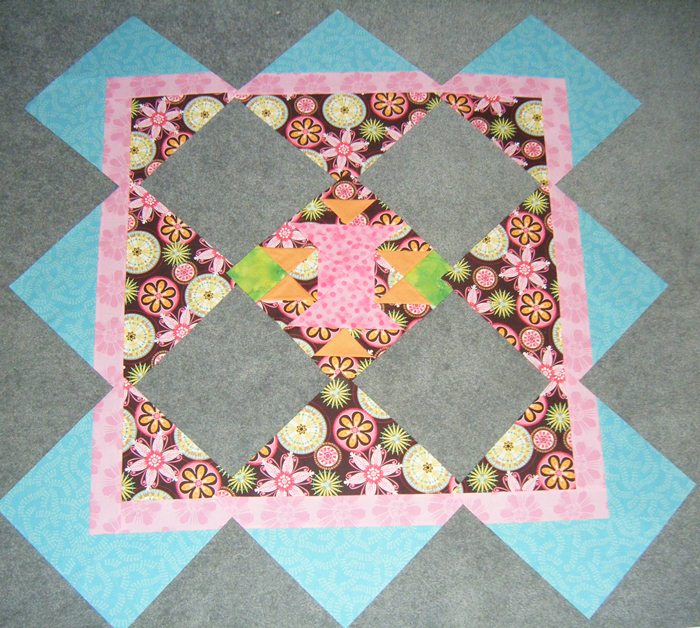
I did the center block just to be a "center" and thought the spool was a good choice. AccuQuilt Go! inspired.
(geezzz... I hope these colors all play well together when I add the other blocks...)
Jules~
@julesquilts on IG
working farm wife and quilter in the off-seasons
Tired.
Modern quilter, QOV volunteer, Improv, FPP w/o stitching on paper, freehand quilting on my long-arm.
BERNINA 790 Pro, Elna Serger, Handi Quilter Fusion, 3 FW, a lot of old Singers and other vintage and antique machines (25+).
- IP
Comment
-
Your welcome. I love the fabric you picked for the quilt and cant wait to see if complete.Jules~
@julesquilts on IG
working farm wife and quilter in the off-seasons
Tired.
Modern quilter, QOV volunteer, Improv, FPP w/o stitching on paper, freehand quilting on my long-arm.
BERNINA 790 Pro, Elna Serger, Handi Quilter Fusion, 3 FW, a lot of old Singers and other vintage and antique machines (25+).
- IP
Comment
-
I'm using the fold-back method we learned in Color my World.... I find it successful I do leave my paper attached for...
-
Newsprint could work for the corners. It is lighter than freezer paper. Try it to see how you like it.
The... -
Thanks, Barbara, for today’s live show. A few questions that got lost in the technical glitch…(1) A few times you mentioned...
-
I am not sure what you mean. I just checked Month 2, all 6 pattern parts show just the one listed in each file, 1-6. ...
-
Hi Barbara just checking when I went to print out Block 2 part 4 of 6 the pattern says part 1 of 6 is this correct do we...
-
All the patterns will remain available until December 31, 2026. Currently, Months 1 and 2 are up. Find them under LEARN:...
-
That works.
Vellum is so thin printers may have trouble pulling just one sheet at a time. -
No. Becky was using her stash and had to make do with a few fabrics. The kits have enough fabric you will not have to piece...
-
I Found the PROJECT/PATTERN TAB! “The how to” answer was on your BLOG thank you!
-
Just a comment. My printer didn't want to work with one piece of vellum. I put one piece of regular paper with one vellum...
-
Hello Barbara! My Name is Naomi. I’m a Star Member. I’ve never done a TQS’s BOM but I have enjoyed watching. I have...
-
Watched Becky's video again and noticed it appears that some of her strips are pieced, not whole pieces of fabric (possibly...
-
Great question, Terri. Becky removes the paper AFTER sewing all the center medallion parts together. Her videos for Month...
- Loading...
- No more items.
What's Going On
Collapse
There are currently 24266 users online. 403 members and 23863 guests.
Most users ever online was 25,462 at 09:35 AM on 01-31-2026.
Forum Stats
Collapse
Topics: 8,389
Posts: 157,390
Members: 28548
Active Members: 1,682
Welcome to our newest member, Glenda Schreiber-lifenmusic.
Latest Topics
Collapse
Trending
Collapse
There are no results that meet this criteria.
Working...
X


Comment